Before Departure
One of the most important jobs of a group leader is to make sure that your group is prepared for their international tour. Use the many months before your tour to have your group ready to travel. As a group leader, setting the expectations early will help ensure that everyone is safe and happy on tour. All the text in pink are links to resources. Feel free to e-mail (FB, twitter, or instagram) me if you want more details on anything presented below!
Staying in contact with your group
I teach in a large school, and travel with many students that are not currently enrolled in my classes. Staying in touch is the most important thing for setting the expectations. I use several different methods to stay in touch with my group. I want both students and parents to be on the same page when it comes to preparing for the tour. The one thing I hate hearing is "i didn't know..." Check out the list below for my favorite methods of communication.
1. E-mail. This one should be no surprise, but I send out many detailed e-mails to my group members. I like being able to include details in the body, and attachments as well. Want a sample of one of my e-mails? Click the link to be taken to the resources page of my travel site (discussed below), where you can find an e-mail that I sent to my group.
2. Website. I created a free website with Weebly.com (very similar to the one you are using right now). I love it because it is "home base" for any information about my tour. I cannot express how quick and easy it is to set up! I would not consider myself very "tech savy", but weebly is basically just a drag-and-drop site. Instead of telling you what is on my site...just check it out, by clicking here.
3. Remind. Remind (formerly known as Remind 101) is a free text service. You just set up an account, and give your students the account code (given to you when you sign up), so that they can enroll to receive texts from you. You can send out a mass text to your group using the service. They cannot see your phone number, and you cannot see theirs. It is a safe and convenient way to keep your group updated. I have several accounts, and use it in the classroom too! Click here to get started with Remind.
4. GroupMe app. GroupMe is an app that is works like a group message. Everyone joins and is placed in a message thread, and communicated with each other. It is a little more versitle than Remind, as it allows user to respond to anyone (Remind is mostly for one-way communication). You can send pictures, make calendar appoints and more using Group Me. This works great to keep everyone on the same page and updated about our tour. Click here to get started with GroupMe.
Getting organized
As they say, getting organized is half the battle. As a group leader, you might have a large group with many people to keep up with. Everyone has different organizational methods that work for their personal style, and you can read about mine below. With that said, do what works best for you...just stay organized!
1. Group Leader Web Site at EFTours.com. The best way to stay in-the-know about your tour is to familiarize yourself with your web site. Did you know that you have your own website?!? When you offically set up a tour through EF, you will get access to a web page that lets you monitor the status of your tour. You can access contact information for each traveler, payment status, and there are also many other helpful resources. Go ahead and log in right now! Don't know how to log in? Contact your Tour Consultant ASAP, they can tell you the log in information and give you a few tips on using your site.
2. Binder. Although it is very low-tech, I depend on my binder to keep necessary paperwork for each traveler. I buy a large binder (at least 2 inches) and enough dividers to have one for each traveler. I create a section in my binder for each individual traveler. In each section I keep: copies of their passports, medical information, emergency contact info, and copy of insurance cards (if necessary). On top of all the dividers I keep a spread sheet so that I can keep track of who has turned in what. I take my binder to each of the pre-departure meetings and collect paperwork at each meeting and file away what gets turned into me. About two weeks before my tour I take everything out, and do a couple of things: (1) scan a copy of everything and save it to my ipad so that I will have an electronic copy while on tour. (2) take one copy of the passport and put it in the parent departure packet (see below), and shrink down all the other documents to 1/2 page, and pack them in my carry-on.
3. E-mail folder. If you haven't already done so, create a separate folder in your e-mail account that you keep e-mails that deal specifically with your tour. You will need to refer again later to e-mails that come from your EF Tour Consultant, so keeping them in a special folder will make your job easier. You will also get numerous e-mails from parents, having a place to store the most important ones will help as well. Be sure that you respond to every parent e-mail in your inbox. The parents are trusting with their child overseas, it makes them uneasy when you do not reliably reply to their concerns.
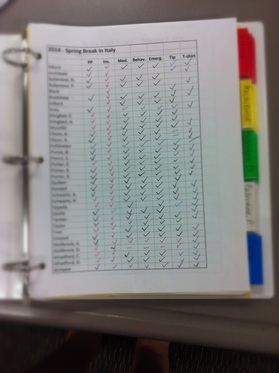
My notebook is so important in the year before my tour departs. Each traveler has a divider, and I keep all of the important documents here.
Passports/Visas
Everyone in your group will need a passport. Depending on your destination(s), you may or may not need a visa. I use the State Department Website to do a search on my destination country/countries.
Here are a few tips:
Here are a few tips:
- Check with your travelers early on determine their passport status. (Do they already have one? Have they applied? Do they know how to get a passport?). I start asking them one year in advance! Click here for a portion of the e-mail that I send to
- Set a application deadline for your travelers. You don’t have much control over how long it will take to process the application, so everyone needs to get started well in advance of your trip. In my experience, parents will wait until the last minute to take care of the details, and often cut it close to the date of departure for the trip. Setting an application deadline, means that you have the peace of mind knowing that they have all applied, you just need to wait for their applications to be processed. Set this deadline months before you trip!
- Educate your travelers on the process to obtain a passport. I have included the letter that I send to my groups on this topic. Steal it and edit for your needs!
- Keep in mind that, depending on your destination, your group members MIGHT need a visa as well. You cannot start a visa application until you have your passport. So, the sooner that they get their passports, the better.
- When everyone has their passports, you will need to make a copy of it and take it with you on the trip. This is just in case someone has a lost or stolen passport while on tour.
- Check the specifics for your destination, but often many countries require your passport must be valid for at least three months beyond your planned date of departure. Have your group members check the expiration date for those who already have passports. They might need to get it renewed depending on its expiration date. So for example, let’s say I have a trip planned to Italy for June 15-25, 2015. I would need to make sure that all passports will expire AFTER September 25, 2015.
Information to collect
As a group leader you need to collect many pieces of information before you leave for tour. I use my website, and google forms to collect some of this information (but not all). Here is a list of what you will need from your travelers before tour:
1. Copies of passport: I make 3 copies: 1 for me, 1 for the parent, and 1 for the student)
2. Health Information. Click here to see the form that I use.
3. Dietary Information. Do you have any vegetarians/vegans? Food allergies?
4. Tip money. I collect tip money from each traveler BEFORE the tour. How much to collect? A simple way to remember it: $10 per day, per traveler. So, for a nine day tour, I collect $90 from each of my travelers. Here is how it is broken down: $6/day/traveler for the Tour Director, $3/day/traveler for the bus driver $1/day/traveler for the local guides. I get lots of questions about HOW to travel with the tip money, so here are a few suggestions:
-Take it all in cash (this is what I do, I go to the bank before tour and have it all put in large bills)
-Deposit it into your account, and withdraw it from the ATM (be sure to check your daily withdrawal limits.)
5. Emergency Contact Information. EF keeps emergency contact information on file (and easy to find on your EF Website), but I ask for additional information from the parents, so that if there is an emergency on tour, I can easily contact them. Click here to see the form that I use.
6. Insurance Information. If a traveler has not purchased EF's All Inclusive or Medical Insurance, I require that they provide a copy of their travel insurance to me.
Meetings
I hold four pre-departure meetings prior to a tour. I am sure to spread them out about 6-8 week apart. These meetings are great for getting to know your travelers, building camaraderie and setting the expectations for international travel. There is a ton of information that the travelers need to know before your tour. I have found that it is better to spread the information out over several months to let it "digest." At each meeting, I collect copies of passports, and medical information forms, and file it away in my binder. Here is a sample schedule and topics discussed at each meeting. Click on the links for a sample meeting agenda. This example is for a June tour, if you are traveling at any other time of the year, adjust your meeting dates accordingly.
January - Life on Tour...What to Expect
-I serve a "tour style" breakfast so that they will know what to expect (e-mail me if you need the details)
-Let travelers get to know each other with a fun icebreaker. Click here to see my "Traveler BINGO" game.
-Handout: Countdown to travel
-Handout: Rules of the Road
-I really set the expectations for behavior (see Behavior Agreement Form)
-I explain the pace of tour (long days, lots of walking)
-I try to paint a clear picture of European hotel rooms and meals
-I walk them through the itinerary, day-by-day
Click here for a sample agenda
March - Travel Safety
-Handout: Travel Safety Dos and Don'ts
-I discuss pick pockets and what to be on guard for
-We go over the Behavior Agreement, and have both students and parents sign the document.
-Have the students pick their roommates, and keep a list (always written in pencil)
-Collect Tip Money
Here are my blank roommate lists: 2 per room, 3 per room, 4 per room. I make the students fill out all options before tour.
Click here for a sample agenda
May - Packing
-I pack a bag a dress as though I am going to the airport, I "unpack" the bag during the meeting, highlighting best packing practices and what not to do.
-I give them a detailed packing list and hand out my packing guide.
-I go over the TSA policy on liquids in the carry-on
-I introduce my travel buddy method, Pairs-n-Squares, and have the students pick their pairs-n-squares. More info about this on the On Tour page.
Click here for a sample agenda
June - One week before departure
-Go over any important last minute details about flights/hotels, etc.
-Do a review of travel safety
-Walk them through want to expect on departure day
-Hand out Parent Packets. I make a packet for the parents of each traveler to keep handy while we are on tour. Each packet contains: Flight information, hotel information, tour itinerary, emergency contact list for the whole group, and a copy of their child's passport.
-Pass out EF backpacks and luggage tags (if you haven't already)
Click here for a sample agenda
